
Ask OGS: Quick, DIY Winter Row Covers
Dear OGS,
As we head into November, I am looking for an easy way to protect my fall garden from winter weather. Do you have any simple solutions?
Eddie
Burnsville, NC
———-
Dear Eddie,
In my own garden, I use a super-simple system. It’s fast, it’s easy, and practically anyone can construct it in just a few minutes. I will demonstrate the steps to “building” this DIY winter protection tunnel, and then talk about issues to contemplate when using this and similar systems, and finally offer a few other ideas. I have used similar shelters on a grander scale for lettuce for the wholesale market. Most of the lettuce was still in decent condition the following March – though some of the lettuce ribs were starting to get brown – but the lettuce was planted early enough that it was nearly full size by mid-October.
Materials:
8’ Fiberglass Rods
These work for a bed width of 4 feet
Length of tunnel divided by 2 plus 1 = Number of rods you will need
For a 12’ tunnel, you will need 7 rodsFloating Row Cover
Length: length of tunnel + distance to ground on both ends + 1’ minimum
Width: should be 7’ (minimum) to 8’ wide for 4’ wide beds
For a 12’ tunnel you will need a minimum length of 19-20’of row cover, at least 7’ wideRocks, Bricks, Soil
Enough rocks/bricks to weigh down floating row cover about every two feet
OR use soil to weigh down one long side of the tunnel. The soil technique will limit harvest accessibility on that side.
How to:
See photo gallery below for reference!
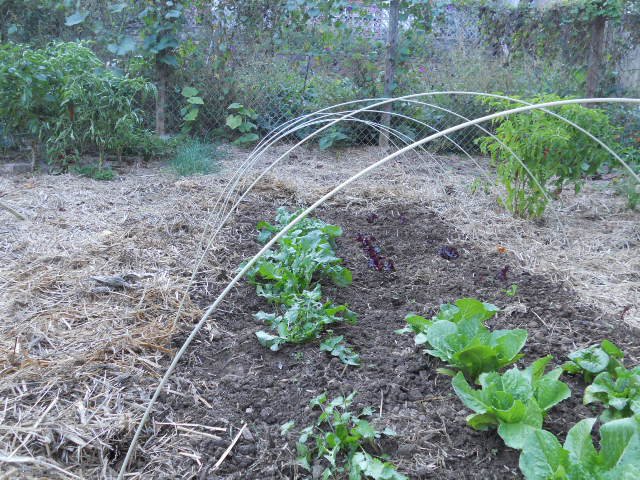
Lay out the garden area you are going to protect.
You will be planting before you need to worry about frost protection, so site and dimension your fall garden accordingly. The rods can successfully span about 4 feet, so measure that width. Determine your length. It is sometimes easier to have two shorter tunnels than one long tunnel. If you like things to be really straight, lay out with string and a tape measure. In wintertime the sun will not be directly overhead. It will be at a lower angle in the sky. Make sure the area will still be in full sun during wintertime. If you have more than one tunnel, make sure one tunnel will not shade the other tunnel.Take your fiberglass rods and jam them down in the ground every two feet on both sides of the tunnel.
I try to set them about a foot deep in the soil. If you hit a rock, move the rod slightly and try again. If you want the tunnel shape to look consistent, make sure the angle of the rod going into the ground is the same everywhere. I don’t recommend setting the rods further apart than 2 feet. It will be too flimsy.Now, pull your row cover across the rods.
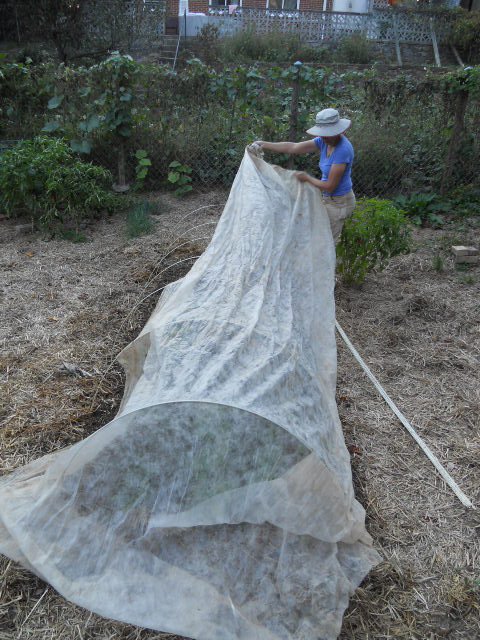
Center it widthwise and lengthwise. On all sides, you should have at least 6” of extra row cover lying on the ground. If you don’t have quite enough, try pushing the rods further into the ground. Rain/water does pass through floating row cover to nourish your plants. Floating row cover comes in a variety of weights. Lighter-weight row cover allows for more light transmission, offers a bit less frost protection than heavier covers, and can double as an insect barrier in warmer weather. Heavier-weight row cover gives you a little more frost protection, but less light transmission. I usually use lighter row cover.Place your rocks/bricks over the extra flap of row cover on the ground.
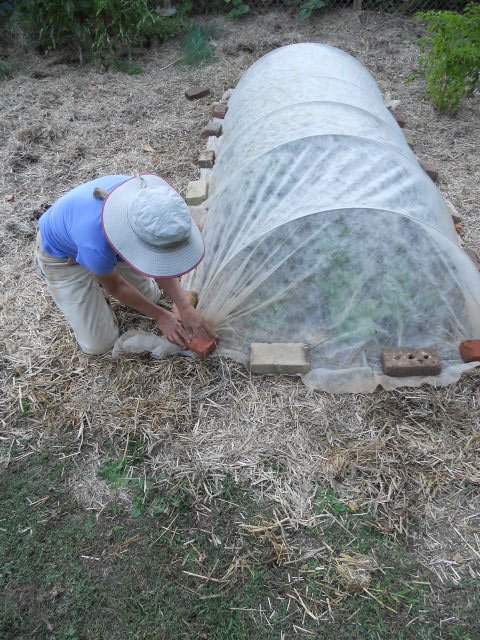
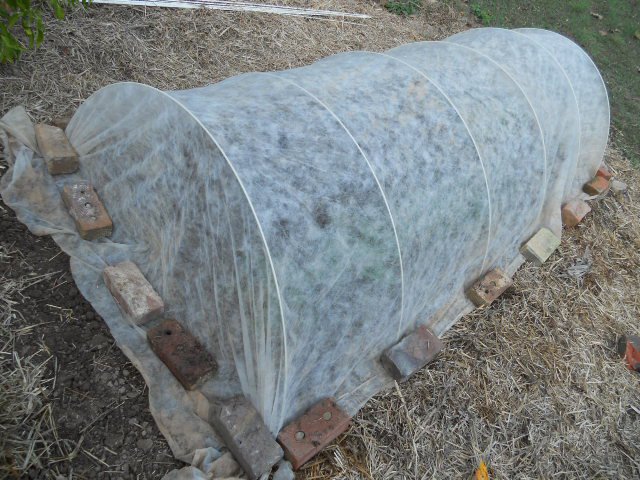
This will secure the cover and keep it from blowing away during a winter storm. Be generous with your rocks/bricks…it’s a bummer to have your cover blow away and see the devastating results in your garden.Note: The corners are important.
You will need to scrunch the excess row cover at both ends of the tunnel. Gather the excess up in a few places along the tunnel end and make sure it is secure. I like to pull the sides tighter and flush with the ends. Extra rocks/bricks are helpful for securing the corners.


HINTS & More:
Plant early enough that your plants are nearly full size before frost. Your plants won’t grow much during cold weather, but if your plants are large already you will have plenty to harvest.
It is easier to plant the tunnel area first – before you build the tunnel.
Spinach and lettuce planted now won’t grow much, but they will quickly kick into gear at the first sign of milder weather in late winter/early spring.
Sometimes I put another layer of rods on TOP of the row cover. Then, when I am harvesting, I push the row cover up between the rods, and the rod-sandwich helps to hold the cover in place during harvest.
Anywhere the cover touches a plant, frost damage can occur. Plant taller plants toward the middle of the tunnel.
Mulch right up to the rods to keep weeds from sprouting in early spring. In fall, soil left bare inside the tunnel will stay warmer.
Soil can be used very effectively to batten down one long side of the floating row cover. However, you cannot harvest very conveniently from the side where soil is holding the cover in place.
Take good care of your row cover so it will last for more than one season. When you unearth the cover for use the following season, keep a lookout for spiders as you open it up, and then check for tears.Image
When it’s really windy, keep an eye on your floating row cover. It typically flies off at dusk in bitter weather with a nor’easter blowing.
Not a big problem, but sometimes animals will burst holes in your cover…maybe because they like the warmth inside.
Snow loads can flatten the fiberglass rods, but they will pop right back up – unfazed – once you dust the snow off the cover.
You could add plastic over the row cover to create a mini-greenhouse. The addition of plastic will require attention to watering and a ventilation plan.
OTHER IDEAS:
# 9 Wire: Instead of the fiberglass rods you can use #9 wire. This is very thick sturdy wire. It comes on a roll and you will need to cut it to length. Because of its thickness, cutting it can be challenging. You can use bolt cutters or (with caution) a circular saw with a metal-cutting blade. I have used a chisel and a small sledgehammer (yes, it was labor intensive!). Usually the diameter of the roll is the right length for support hoops. Places like Southern States sell this wire. One downside: When I used this wire as bows for my tunnel, a snow load permanently distorted and somewhat flattened the arch of my wire bows (but they did not collapse completely).
PVC pipe: PVC pipe is more rigid than the fiberglass rods, but it is more complicated to work with, requires a supporting structure, and it doesn’t have the long term longevity. After it starts cracking, it ends up in the landfill. Alternatively, PVC gray “conduit” in the electrical section at building supply stores is treated to be sun-resistant, so it does not become brittle the way white PVC water pipe does. It will collapse under a heavy snow and pop back up as the snow melts like the fiberglass rods.
Wire ladder masonry reinforcement: Found at building supply stores, these wire ladders can be bent into an arch for use in low tunnels to support floating row cover.
High Tunnel Link: Here is a great link that Tom Elmore sent me for building a high tunnel/hoop house. This is a serious structure that would take some time and planning to construct. The fastening system can be used for constructing low tunnels also. Click here to check it out.
SOURCES for materials:
The rods can be purchased locally at Reems Creek Nursery, Fifth Season Gardening, and possibly others. They can also be ordered from Seven Springs Farm.
The floating row cover (also called Reemay) can be purchased at local garden supply stores, agricultural supply stores, and possibly at hardware stores.
Thanks for writing Eddie. I am just going to add that I LOVE the simplicity and ease of this fiberglass rod system. Besides being easy and quick, the rods take up very little room in storage. Ten rods take up about the same room as one PVC pipe.
All the best,
OGS